 Today I welcome my good friend and professional photographer Al Lemire back to the blog. We all think, thanks to Instagram, we’re professional photographers now. Well, it’s not that easy – I asked Al to help us with some tips on taking our own photographs and to help us determine when we need to bring in the big guns like him.
Also, you should follow him on Tumblr.
I just returned from a trip to Oregon where I explored the hugely popular food cart craze that is prevalent in Portland. As I perused the choices, I was struck by the inherently bad food photography that many of them displayed. I’m sure they meant for the photographs to inform customers what they could expect with different dishes, but in the end, they looked so unappetizing, they lost my potential business.
I live in a small town, and sometimes experience the same thing in our local magazine. In the Dining section which includes a short description of the restaurants and a small photo of their signature dishes, it is pretty apparent which restaurants supply the magazine with professional photography, and which ones simply take their own photographs.
As a photographer, I have a number of clients that rely on me to take all of the photographs that they use in their websites, catalog, advertisements, etc..
I also have clients that sometimes hire me, and sometimes shoot their own. It usually depends on the use of the photo. Something simple on white they might take care of themselves. Something more important – an ad for a magazine, landing image for their homepage, an image for a blogger, and I’ll get the call.
As technology has continued to improve both cameras and software, everyone, including business owners and marketers thinks they are a photographer. Coming from a professional, I realize this might sound self-serving. The good thing is, you really can take better photos on your own for some needs.
But how good is “good enough”? When should you decide to take your own photographs and when is it time to call in the pros?
It depends. It depends on your own talent, equipment capabilities, and the use of the image.
Bottom line: :If the photograph is informational or something quick for your social outposts, it makes sense to attempt it yourself. However, if the photograph is to help create an emotional relationship with your client/customers, then you should probably hire a professional.
I’ll give you two examples:
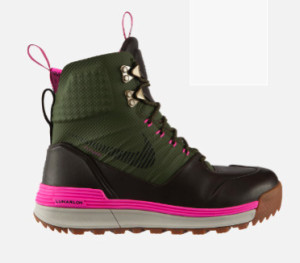
The shot on white is a good solid informational photograph. It shows the shape and color of the boot. It also shows that it goes over the ankle, and what kind of lacing system it has. It could possibly be done by anyone with a camera and a bit of knowledge.
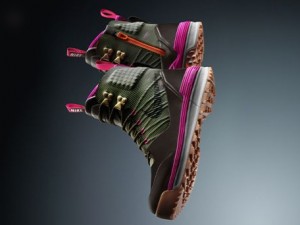
In the shot on grey, you see that a lot more thought (and talent) went into photographing the boots. Not only do you see the same things as in the shot on white, but the lighting is used to show more details, you can see the bottoms of the boots, and the background is more interesting visually.
The shot on white shows a boot. The shot on grey shows an adventure for your foot.
If you were shopping for boots, which ones would you pay more for? More importantly, if you had $200 to spend on a hiking boots and were surfing the internet, which store would you buy from?
Do I Need a Stylist?
You might not realize the amount of work and preparation that goes into a single photograph. Stylists are the unsung heroes of creating amazing photographs. In the examples above, they make sure the shoelaces are tied perfectly, the tabs and loops look symmetrical, and stuff the shoe to make sure it looks like it’s perfectly molded (and hasn’t been sitting boxed up in the in the stockroom room for a few weeks).
Sometimes you can style things yourself, but be sure and give that consideration – style the photo before you just take it. Other times, it’s worth it to spend the money to hire a stylist.
In the end, your first contact with a customer could very easily be a photograph of your product/service. That’s the time to put your best foot forward if you’ll pardon the pun.
How To Take Your Own Photograph
If you want to use your camera phone, that’s great for many uses, but remember: If you are trying to photograph something really light or really dark, it’s not going to work out very well. Cameras will always measure the amount of light coming in and select an exposure that will render everything a medium gray (in tone, not color). So, if you are taking a picture of a person wearing white in a white room, they will come out looking dark. Likewise, if you photograph a person wearing black in a dark room, they will come out much lighter.
Let’s look at three scenarios where one might want to try these….
Restaurant owner photographing a plate of food:
Consider making it look like someone just sat down at the. Have a place setting, glass of ice water, and maybe a glass of wine (try white, red wine looks black unless you dilute it with water or white wine). Pick a table near a window, but WITHOUT direct sunlight coming in. If you have a covered patio or a wall of windows, even better. Shoot from a couple of angles and then decide which one shows the food off the best. Food must look fresh and moist, feel free to brush on some olive oil if anything looks like it’s drying out. Do not use your flash, let the ambient light envelope the food.
Travel writer photographing a room:
Turn your flash off. Number one rule is to keep your camera level, this keeps your perspective correct. Doors should remain parallel to the sides of the camera frame. If you are shooting during the day and there are windows in the room, try and cut down the amount of light coming in through them by adjusting shades, blinds, or curtains (otherwise it will look like there is a nuclear explosion going on outside). You’ll want some light coming through, but not too much. If you have an HDR (high dynamic range) setting on your camera or phone, this is the perfect time to use it.
Event attendee photographing people:
Now you can use your flash. This helps separate the subject from the background. If they are using spotlights, photograph them in those lights (unfortunately, these reveal wrinkles and any other skin imperfections like you wouldn’t believe). If you are able, have the person step over to a window (again, without direct sunlight coming in) and have them stand next to it. Photograph them with the window on their right or left side, with you standing next to the wall. Don’t shoot them with the window behind them, you won’t be able to see them.
If you know that you are going to be somewhere and you will need to photograph someone or something, practice. Try and find a room that is similar….a room with the same amount of windows…practice on a plate of food before the chef brings out the “hero” (extremely common when photographing food).
Disclaimer: Most photographers have developed their own ways of photographing different scenarios, and rarely do two ever agree. Show these tips to any photographer and they will most likely give you other directions 🙂
Interested in elevating your organization’s positioning with effective storytelling?
Download this ebook: From Transactional to Transformational
[ssba]

Leave a Reply